Airace One: Difference between revisions
Jump to navigation
Jump to search
(Created page with "=Airace One= ==Installation Instructions== #Open Google Play Store on your Android Smartphone and search for “Airace One”. #Click on the top result and click Install to install the application on your smartphone. #Here is a direct play store link: [https://play.google.com/store/apps/details?id=com.airace.one&pcampaignid=pcampaignidMKT-Other-global-all-co-prtnr-py-PartBadge-Mar2515-1 Airace One] ==System Requirements== * Operating System: Android Oreo (8.0) or h...") |
No edit summary |
||
| Line 20: | Line 20: | ||
# It will ask you to log in to your Airace One account using your phone number and OTP. By logging in, you can have access to an online saved device and online survey project. You can also tap on ‘Skip Login’ to proceed without login | # It will ask you to log in to your Airace One account using your phone number and OTP. By logging in, you can have access to an online saved device and online survey project. You can also tap on ‘Skip Login’ to proceed without login | ||
# The App has three main tabs to navigate to viz-a-viz, Devices, Survey, and Settings and a top status bar where we can see if any device is connected, NTRIP connection, No. of satellites visible etc. as shown in the screenshot below. | # The App has three main tabs to navigate to viz-a-viz, Devices, Survey, and Settings and a top status bar where we can see if any device is connected, NTRIP connection, No. of satellites visible etc. as shown in the screenshot below. | ||
==Status bar== | |||
# The status bar provides real-time information on various aspects of the Airace One Mobile App. | |||
# The leftmost corner displays a flag indicating the NMEA status, such as Single, Float, DGPS Fix, or RTK Fix. | |||
# The Wi-Fi icon indicates whether the device is connected to NTRIP. | |||
# The Bluetooth icon shows the connection status between the app and Airace Rover/Base devices. | |||
# The satellite icon and accompanying number display the currently visible satellites. | |||
# If connected to NTRIP, the status bar will also show the age of correction data for DGPS and RTK solutions, measured in seconds. | |||
# The rightmost corner displays the Offline/Online status, indicating whether the user is logged in. | |||
# Additionally, the status bar indicates whether IMU corrections are enabled. | |||
==Manage Device Configuration== | ==Manage Device Configuration== | ||
| Line 43: | Line 54: | ||
===Switching Base/Rover Mode=== | ===Switching Base/Rover Mode=== | ||
* After establishing a successful Bluetooth connection, you can switch between Rover and Base modes. | |||
* Click on the '''Switch Rover/Base''' button, then select either '''Switch to Base Mode''' or '''Switch to Rover Mode''' on the subsequent screen. | |||
===Configure Rover=== | ===Configure Rover=== | ||
* Click on the '''Configure Rover''' button to access Rover configuration settings. | |||
* You can adjust the measurement rate (in Hz or seconds), modify the dynamic model, select the satellite constellation, and set the minimum satellite signal threshold, among other options. | |||
===Configure Base=== | ===Configure Base=== | ||
* Click on the '''Configure Base''' button to enter Base configuration mode. | |||
* You can toggle Base mode, set the minimum observation time, adjust the mean 3D standard deviation in meters, view the Base value, and enable long-range radio, among other settings. | |||
===Configure Logging=== | ===Configure Logging=== | ||
* To configure logging, click on the '''Logging''' button. | |||
* You can choose to log data to an SD card and set parameters for maximum log time and maximum log length. | |||
===Messages=== | ===Messages=== | ||
Click on the '''Messages''' button, then select the '''Reset to PPK/RTK Logging Defaults''' option on the following screen to restore logging settings to their default state. | * Click on the '''Messages''' button, then select the '''Reset to PPK/RTK Logging Defaults''' option on the following screen to restore logging settings to their default state. | ||
===Configure Wi-Fi=== | ===Configure Wi-Fi=== | ||
* Click on the '''Configure Wi-Fi''' button to enter Wi-Fi credentials. | |||
* Provide the SSID and password to set up the Wi-Fi connection. | |||
===Configure Radio=== | ===Configure Radio=== | ||
Click on the '''Radio Setup''' button to configure the Radio Port Baud Rate and Data Port Baud Rate. | * Click on the '''Radio Setup''' button to configure the Radio Port Baud Rate and Data Port Baud Rate. | ||
===Enable/Disable IMU=== | ===Enable/Disable IMU=== | ||
Click on the '''Enable IMU''' button to activate the IMU. Once enabled, the button will change to '''Disable IMU'''. Click on it to deactivate the IMU. | * Click on the '''Enable IMU''' button to activate the IMU. Once enabled, the button will change to '''Disable IMU'''. Click on it to deactivate the IMU. | ||
===Reset to Defaults=== | ===Reset to Defaults=== | ||
Click on the '''Reset to Default''' button to revert all configuration settings to their default values. | * Click on the '''Reset to Default''' button to revert all configuration settings to their default values. | ||
==Settings== | |||
[[File:Settings_CORS.png|right|x300px]] | |||
The '''Settings''' tab allows you to manage NTRIP caster profiles, configure measurement units, and set up Wi-Fi. Additionally, you can reach out to our support team via the '''Email Support''' button to email us at info@airace.in, or use the '''Call Us''' button for direct phone support. | |||
===Setting up an NTRIP Profile=== | |||
# Before setting up and connecting to an NTRIP caster, ensure you are connected to an Airace GNSS Receiver. | |||
# Once connected, navigate to the '''Settings''' tab and click on the '''Airace Catalyst Profile''' button to add a profile. | |||
# A new pop-up window will appear. Click on the '''Add New Profile''' button. | |||
# On the next screen, enter the profile name and credentials for Airace Catalyst, then tap on '''Save Settings'''. | |||
# The new profile will be added, and you can create multiple profiles if needed. | |||
# Select the desired profile and press the '''Start CORS''' button to begin receiving NTRIP corrections. | |||
# When NTRIP corrections are received, the Wi-Fi icon in the status bar will turn on, indicating a successful connection. | |||
===Setting App Units=== | |||
[[File:Settings_Unit.png|right|x300px]] | |||
# By default, the length unit is set to meters, and the area unit is set to square meters. | |||
# To change these settings, click on the '''Unit Selection''' button in the '''Settings''' tab and choose your preferred length and area units from the dialog box. | |||
# The app supports the following length units: | |||
#* Meter | |||
#* Feet | |||
# The app supports the following area units: | |||
#* Square Meter | |||
#* Square Feet | |||
===Wi-Fi Configuration=== | |||
To configure Wi-Fi settings, click on the '''Airace Wi-Fi Config''' button in the '''Settings''' tab. | |||
Revision as of 09:57, 9 August 2024
Airace One
Installation Instructions
- Open Google Play Store on your Android Smartphone and search for “Airace One”.
- Click on the top result and click Install to install the application on your smartphone.
- Here is a direct play store link: Airace One
System Requirements
- Operating System: Android Oreo (8.0) or higher
- RAM: 2GB or more for optimal performance
- Internet Connection: Stable and active
- Wifi/Bluetooth Connection
- Screen size: 6.0 inch or higher
How to Use

- On opening the Airace One Mobile App for the first time, you will be required to give Bluetooth and Location permission to the app which is required for proper functioning of the app.
- It will ask you to log in to your Airace One account using your phone number and OTP. By logging in, you can have access to an online saved device and online survey project. You can also tap on ‘Skip Login’ to proceed without login
- The App has three main tabs to navigate to viz-a-viz, Devices, Survey, and Settings and a top status bar where we can see if any device is connected, NTRIP connection, No. of satellites visible etc. as shown in the screenshot below.
Status bar
- The status bar provides real-time information on various aspects of the Airace One Mobile App.
- The leftmost corner displays a flag indicating the NMEA status, such as Single, Float, DGPS Fix, or RTK Fix.
- The Wi-Fi icon indicates whether the device is connected to NTRIP.
- The Bluetooth icon shows the connection status between the app and Airace Rover/Base devices.
- The satellite icon and accompanying number display the currently visible satellites.
- If connected to NTRIP, the status bar will also show the age of correction data for DGPS and RTK solutions, measured in seconds.
- The rightmost corner displays the Offline/Online status, indicating whether the user is logged in.
- Additionally, the status bar indicates whether IMU corrections are enabled.
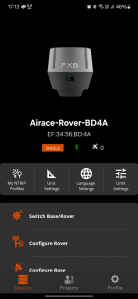
Manage Device Configuration
In the Devices tab, you can efficiently manage and configure your devices. This includes:
- Connecting to Airace GNSS Devices: Pair and connect to your Airace GNSS devices via Bluetooth.
- Mode Selection: Switch between Base and Rover modes as needed.
- Configuration Settings: Set up and adjust Rover and Base configurations.
- Radio Setup: Configure radio settings for optimal performance.
- Message Logging: Enable or disable message logging as required.
- IMU Management: Turn the IMU (Inertial Measurement Unit) on or off.
- Reset to Default: Restore device settings to their default configuration.
This comprehensive management functionality ensures that you can tailor your device settings to meet your specific requirements.
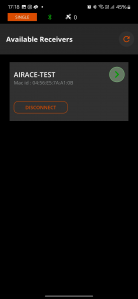
Connecting to Airace Rover/Base via Bluetooth

- In the Devices tab, click on Device Connection and check if your Airace rover/base is listed. If it is not listed, first pair your device with your mobile device via Bluetooth, and then click Refresh.
- Once your device appears in the list, click the Connect button to initiate the connection.
- After a successful connection, the Connect button will show as Disconnect button.
- To disconnect a device click onDisconnect button.
Switching Base/Rover Mode
- After establishing a successful Bluetooth connection, you can switch between Rover and Base modes.
- Click on the Switch Rover/Base button, then select either Switch to Base Mode or Switch to Rover Mode on the subsequent screen.
Configure Rover
- Click on the Configure Rover button to access Rover configuration settings.
- You can adjust the measurement rate (in Hz or seconds), modify the dynamic model, select the satellite constellation, and set the minimum satellite signal threshold, among other options.
Configure Base
- Click on the Configure Base button to enter Base configuration mode.
- You can toggle Base mode, set the minimum observation time, adjust the mean 3D standard deviation in meters, view the Base value, and enable long-range radio, among other settings.
Configure Logging
- To configure logging, click on the Logging button.
- You can choose to log data to an SD card and set parameters for maximum log time and maximum log length.
Messages
- Click on the Messages button, then select the Reset to PPK/RTK Logging Defaults option on the following screen to restore logging settings to their default state.
Configure Wi-Fi
- Click on the Configure Wi-Fi button to enter Wi-Fi credentials.
- Provide the SSID and password to set up the Wi-Fi connection.
Configure Radio
- Click on the Radio Setup button to configure the Radio Port Baud Rate and Data Port Baud Rate.
Enable/Disable IMU
- Click on the Enable IMU button to activate the IMU. Once enabled, the button will change to Disable IMU. Click on it to deactivate the IMU.
Reset to Defaults
- Click on the Reset to Default button to revert all configuration settings to their default values.
Settings

The Settings tab allows you to manage NTRIP caster profiles, configure measurement units, and set up Wi-Fi. Additionally, you can reach out to our support team via the Email Support button to email us at info@airace.in, or use the Call Us button for direct phone support.
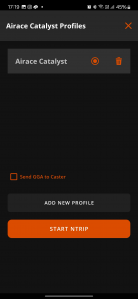
Setting up an NTRIP Profile
- Before setting up and connecting to an NTRIP caster, ensure you are connected to an Airace GNSS Receiver.
- Once connected, navigate to the Settings tab and click on the Airace Catalyst Profile button to add a profile.
- A new pop-up window will appear. Click on the Add New Profile button.
- On the next screen, enter the profile name and credentials for Airace Catalyst, then tap on Save Settings.
- The new profile will be added, and you can create multiple profiles if needed.
- Select the desired profile and press the Start CORS button to begin receiving NTRIP corrections.
- When NTRIP corrections are received, the Wi-Fi icon in the status bar will turn on, indicating a successful connection.
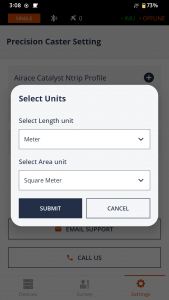
Setting App Units

- By default, the length unit is set to meters, and the area unit is set to square meters.
- To change these settings, click on the Unit Selection button in the Settings tab and choose your preferred length and area units from the dialog box.
- The app supports the following length units:
- Meter
- Feet
- The app supports the following area units:
- Square Meter
- Square Feet
Wi-Fi Configuration
To configure Wi-Fi settings, click on the Airace Wi-Fi Config button in the Settings tab.